Inspired by Utah
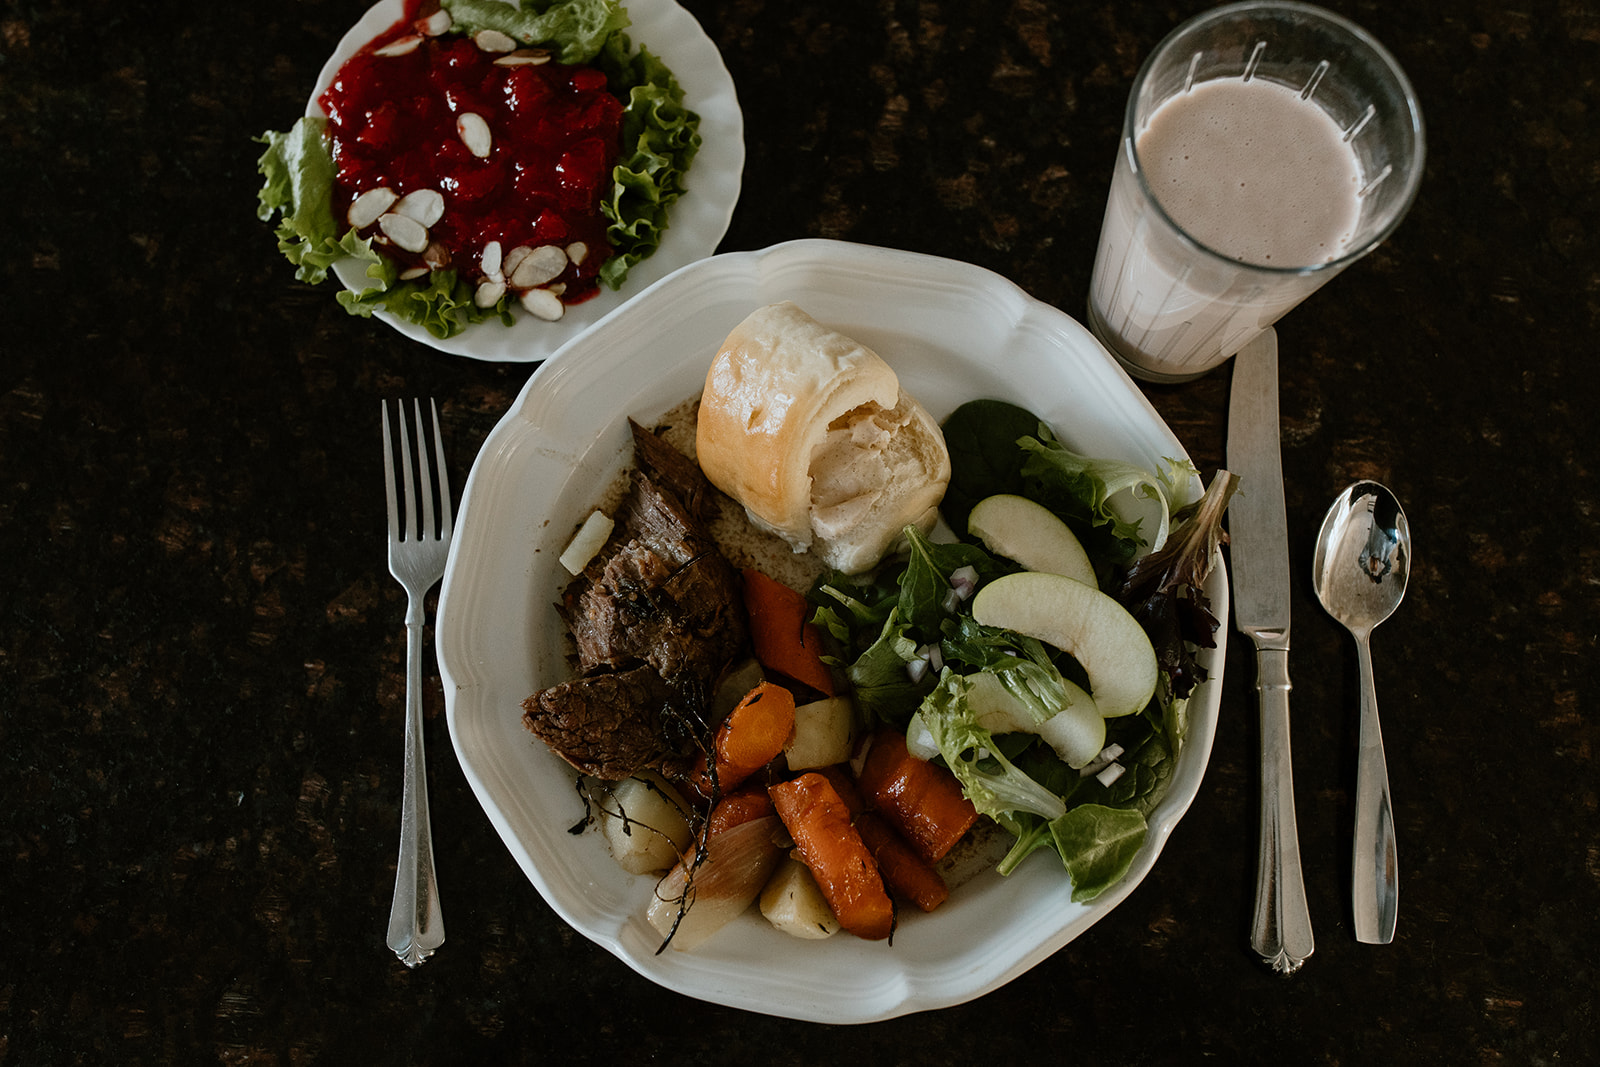
Starting my culinary journey at home, this hearty Utah meal represents the many Sunday dinners I’ve shared with family and friends throughout my life.
THE MEAL
(Click on the links above to jump to that part of the post!)
Welcome to my state meal cooking challenge! I’m so excited to finally be doing this. I’ve got foods on this list that I’ve never even heard of before, let alone made. I know it’s going to be a great experience full of delicious food and (most likely) many mistakes to learn from.
I was going to do the states in alphabetical order, but it made more sense to me to go geographically so that I can reuse some ingredients and get more of a feel for how things would be if I actually traveled around the country. And so we start this culinary journey at my home state, Utah!
If you ask around, everyone will tell you that Utah’s iconic foods are pastrami burgers, funeral potatoes, and Jell-O. I agree with that for the most part, but you’ll see on the recipe list above that I’m only including one of the three, and even that one was kind of a reluctant choice.
Pastrami burgers are popular here, I guess, but only at certain fast-food restaurants. I don’t know anyone who has a barbecue and throws pastrami on their burgers because they just can’t eat a burger without it. I’d say it’s more of a quirk here than a must-have. Instead, I decided to go with a Dutch oven pot roast for the main dish.
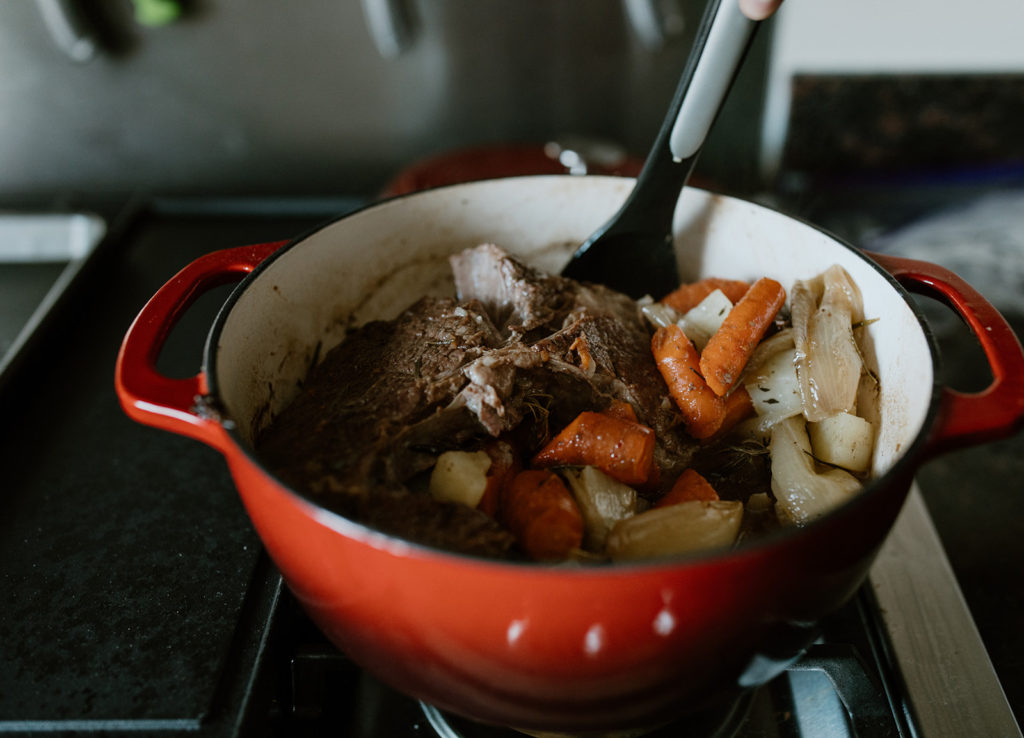
Dutch ovens are Utah’s state cooking pot (yes, really). I’m one of those Utahns who comes from pioneer stock on both sides of my family, so I know I don’t speak for EVERYONE who lives here, but Dutch ovens mean a lot in a traditional sense. The pioneers relied on them heavily during their journey to the West, and we still use them all the time–not just the pretty ones you use in ovens at home, but also the huge, heavy-duty ones that you bury in coals to make roasts and peach cobblers for camp-outs and such. So of course I had to make something in a Dutch oven, and when I think of a classic Sunday dinner with my family, I think of pot roast. In fact, the Sunday before I made this meal, my parents had us over for (you guessed it) pot roast!
Funeral potatoes are also very iconic to Utah, but in my experience, they’re made for two occasions: Easter, and more formal church gatherings like funerals (hence the name). I definitely wouldn’t call them a common side dish. I love funeral potatoes and would be happy to share that recipe sometime in the future, but for this challenge, I didn’t want to have potatoes in the pot roast AND funeral potatoes.
UPDATE: I did end up making funeral potatoes for Easter, so if you want my go-to recipe, click here!
As for the Jell-O . . . I know that for a LONG time, Utah was the highest consumer of Jell-O in the United States. Heck, we probably still are. Jell-O was a big fad food in the 20s and 30s, and that love of gelatin didn’t fizzle out in Utah until fairly recently. We have big families here and lots of church potlucks–a really cheap food that you can make for a lot of people is a lifesaver. The most iconic version was green Jell-O with shredded carrot for some reason. Probably because “green” plus “shredded carrot” equals “healthy,” right? 😉 But anyway, we really don’t eat it much nowadays. I can’t remember the last time I just had plain Jell-O from a packet, and I’ve never tried the shredded carrot version. The only reason I’m doing it for this challenge at all is that both of my grandmothers have their own recipes for Jell-O that bring fond memories, so I can’t deny that it’s a significant dish in my life.
If I were to choose a dessert that’s truly popular in Utah, though, it would be pink-frosted sugar cookies. The Lofthouse sugar cookies were always the draw of church potlucks when I was younger, and now cookies are sold at the myriad soda drive-thrus and cookie shops we have throughout the state. Again, maybe I’ll make those some other time.
Okay, that’s enough of an explanation for what I decided to make and why. On to the cooking!
DUTCH OVEN POT ROAST
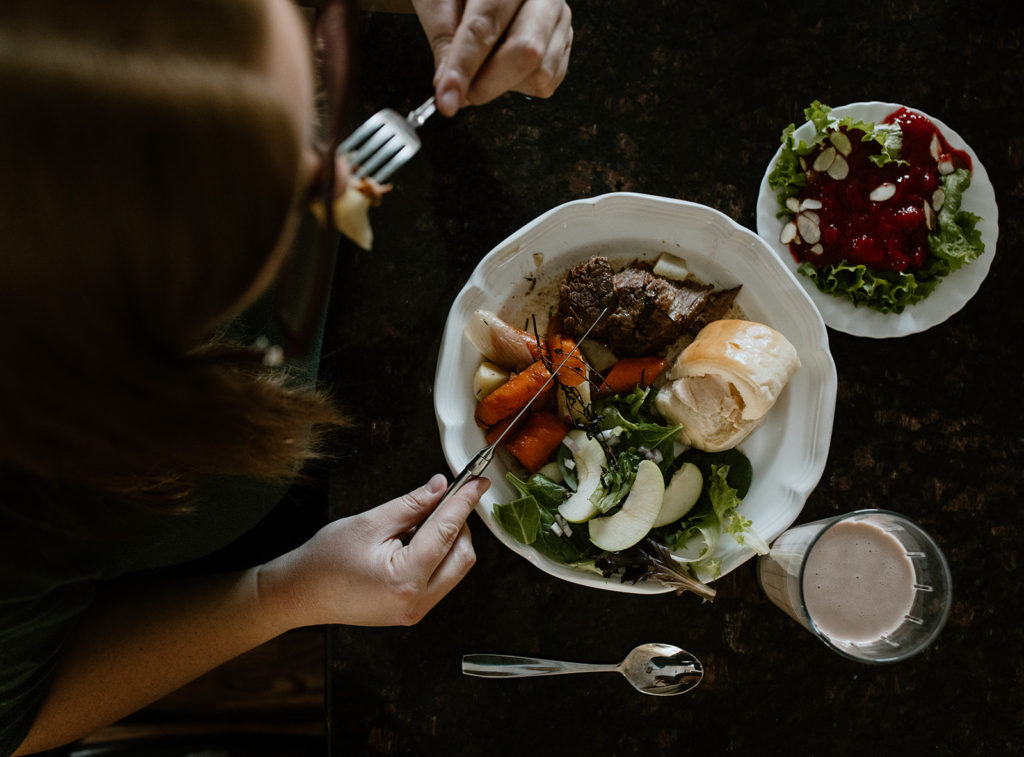
The main dish for this meal was the Dutch oven pot roast. My first time making one was a huge success! I inadvertently made this meal on Fast Sunday (the first Sunday of the month when we fast together for religious reasons), so we were all hanging out at my parents’ house, trying to ignore our empty stomachs, while the smell of a simmering roast permeated the room. We were practically salivating when it was time to eat, and I think the anticipation made it even better!
The recipe I found called for a 5-lb chuck roast, but I could only find a 3.6-pounder, and even that was hard to manage when it was raw. A 5-pounder would have been a struggle. Three and a half pounds was plenty to feed five people. We all had second helpings and there was still a little bit left over!
I browned all the vegetables in the Dutch oven, then seared the meat on all sides before adding some beef broth and herbs, covering it, and letting it all roast at 275 degrees F. for 4 hours. By the time we ate, the fat had mostly rendered out, and the meat was fall-apart tender and filled with salty, rustic flavor from the herbs and veggies.
It really hit the spot, and the five of us ate almost the entire thing in under a half hour. Definitely a success. But I think next time I’ll let it roast for another hour or two just to render the fat completely and make the meat EXTRA tender. And I’ll also thicken the drippings into a gravy. The liquid was really thin and spread all over our plates, which was fine but not ideal.
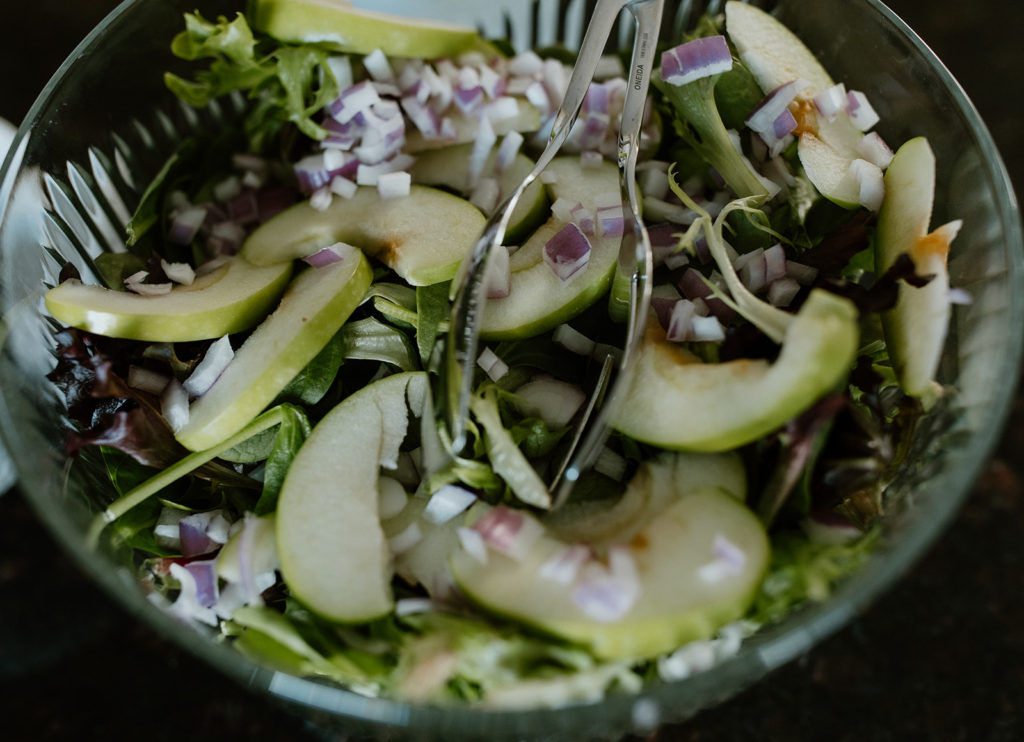
GREEN SALAD
With our pot roast, we almost always have a green salad. Actually, we tend to have a green salad at every meal. Gotta have something green along with the meat, rolls, and dessert! I’m not giving a recipe for today’s salad because it’s super basic. My mom just threw together spinach, spring mix, green apples, and red onion. We always just toss together whatever we have on hand, and apples and onions are our go-to these days. In the summer, we use more fresh tomatoes, cucumbers, and carrots. We usually top it off with ranch, Italian, or poppyseed dressing, but we bring out all the dressings and everyone just picks whatever they want. There are no rules!

LION HOUSE DINNER ROLLS
These rolls turned out so good. Fluffy, buttery, and very pretty, they were perfect for mopping up the pot roast drippings.
I decided to make Lion House rolls because they’re so familiar to me after a lifetime of going to Temple Square in downtown Salt Lake City. The Lion House is a historic building that was once home to Brigham Young, the first governor of Utah and the second president of the Church of Jesus Christ of Latter-day Saints. The building has had many functions since it was built in the 1850s, but nowadays it’s rented out for parties and such, and the ground floor has a cafeteria-style restaurant that’s best known for its rolls. In addition to being fed to Temple Square’s countless visitors, Lion House rolls can be bought in local stores fresh or frozen, and the copycat recipe has been passed around for ages.
I do have some experience making rolls, and these were pretty easy to make, all things considered. The only thing different about this recipe from any basic roll dough is that you add dry milk at the beginning. I’ve never used dry milk in a recipe before. I can’t say that I noticed much of a difference–especially since you dissolve it in water at the beginning to make milk (so couldn’t you just use regular milk??)–but that’s how they’re traditionally made, so I went with it!
I don’t know if it was the dry milk or if my house was just at the perfect temperature, but this dough rose SO FAST. It almost spilled out of the bowl on the first rise, and when I had to bake them in two batches, I was worried that the second batch would rise too much while the first one baked. Luckily that didn’t happen.
Shaping the dough should have been simple, but I’m less experienced with that. As Paul Hollywood would say, these rolls were “a bit of a mess.”
To make these, all you need to do is roll the dough out into a rectangle, then cut it into even strips and roll those strips up–similar to a crescent roll, but even on the sides. I thought I was doing a good job cutting them all the same lengths and widths, but when I rolled them, it was clear that some were much thicker and wider than others. It made a big size difference, and they all seemed to rise at different rates, too. I’m not sure if that was because of the uneven rolling, but I’m guessing so. I definitely need to get me one of those baking mats with measurements on it so I can make these rolls more uniform next time.
(And now that I think about it, I could have just made these like cinnamon rolls–by rolling the dough into a rectangle, rolling the whole thing like a swiss roll, and then cutting it into rolls of even widths. It might have saved me some trouble.)
Thankfully, large or small, these rolls were yummy. They disappeared quickly along with the pot roast. I can’t say that they were remarkably better than other rolls I’ve made in the past, but it’s definitely a recipe I’ll hang on to and try again another time.
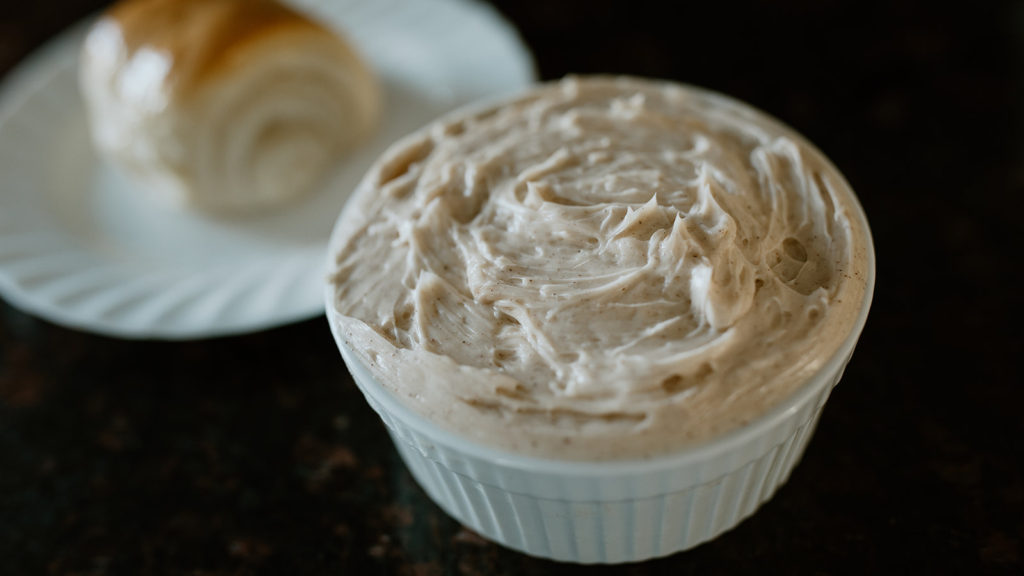
MAPLE HONEY BUTTER
Instead of putting jam on our rolls, I decided to whip up some maple honey butter. You just can’t go wrong with honey butter, in my experience, and I had to include something to the meal that involved honey, because we’re big into honeybees here. The beehive is our state emblem, the honeybee is our state insect, the Beehive Cluster in the constellation Cancer is our state astronomical symbol (I just learned that just now), and they initially wanted to name the state Deseret, which means “honeybee” (which is why we have Deseret Book, Deseret Industries, and The Deseret News).
The amount in the picture is double what the recipe says, because my mom thought we would need much more than we did. It was really easy to make, though–just beat 1/2 cup room-temperature butter until fluffy, then add 1/4 cup honey, 1/2 tsp maple syrup, and 1/4 tsp cinnamon, and serve! Nothing else to it!
It went great with the Lion House rolls, and my dad was so impressed with the simplicity and relative healthiness of the ingredients that I know he’s going to make some more on his own time!

BYU COOKIES & CREAM MILK
For the drink, I had to choose milk, because we’re the #3 most sober state! Whoo! BYU, the #1 most sober college in the nation, has their own creamery milk that’s sold throughout the state, including the super indulgent cookies and cream milk, which could absolutely count as a dessert on its own. I just bought a couple bottles for this challenge, but here’s a copycat recipe if you want to make your own, or if you just want to see how insanely sugary it is. It’s basically like drinking melted cookies and cream ice cream–it sticks to your throat and gives you an instant sugar buzz. I have to admit, I love the stuff. But it’s definitely a “sometimes” food.
If you want to do your own state challenge and can’t find or don’t want to make BYU cookies and cream milk, another popular beverage here is flavored soda–just any soda base with whatever flavored syrup you choose. If you come to Utah, you’ll find soda shops EVERYWHERE.
GRANDMA’S RASPBERRY-RHUBARB JELL-O
For dessert, I was going to make two versions of Jell-O, a recipe each from my grandmothers. My maternal grandmother passed away when I was only 11, but I can still remember how much I loved the fun, wobbly rainbow Jell-O she sometimes made for family dinners. It’s a pretty simple recipe, just time-consuming. I ended up not having the time or fridge space to make it for this, but I might make it for a St. Patrick’s Day dessert sometime! If you’re curious what it’s like and how to make it, here’s a recipe! My grandma made it with a full rainbow of colors, but you can easily customize it with whichever colors you like, and can even make it with real fruit juice instead of Jell-O packets. Here’s a recipe that teaches that technique.
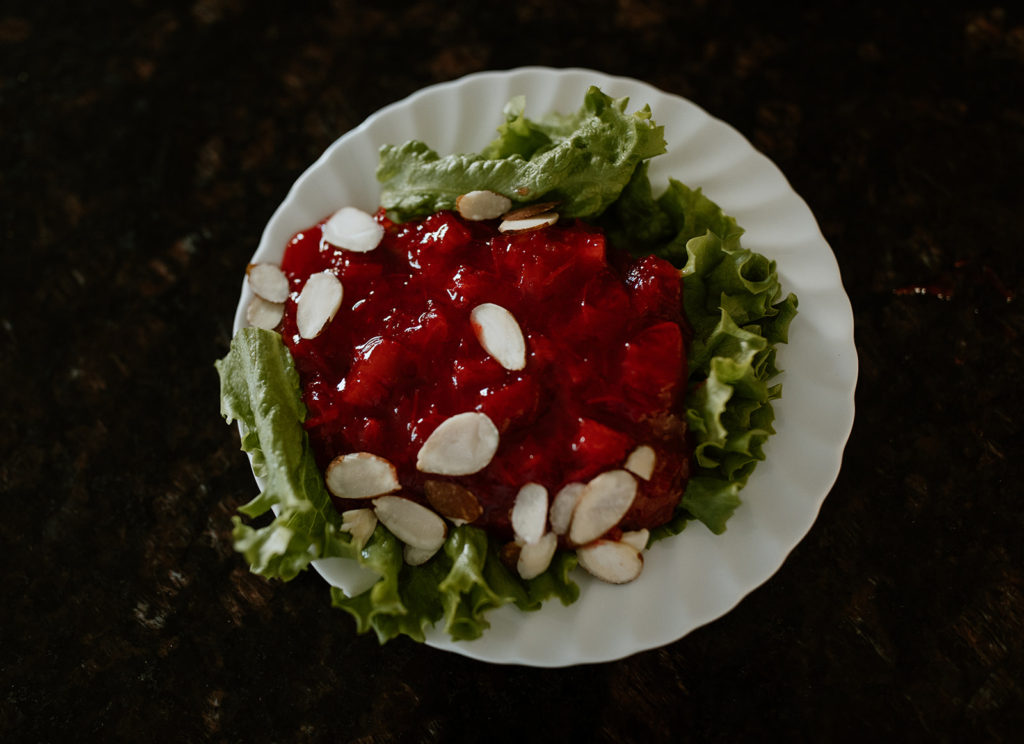
My paternal grandmother makes her signature raspberry-rhubarb Jell-O on a regular basis. And not even for dessert! She calls it a Jell-O “salad” and serves it as a side dish with the rest of the meal. It’s definitely a different texture and consistency than you’d find with basic Jell-O. Since it’s full of rhubarb pulp, it’s denser, almost like eating a custard instead of a gelatin. The flavor is very tart and sweet. It’s kind of refreshing and definitely gives your tastebuds a new experience compared to the earthy, salty flavors of the rest of the meal.
Her Jell-O would have made a great, iconic dessert for this meal, but it didn’t really turn out perfectly for me, so I almost hesitate to count it. I know what went wrong, though, so I’m going to move on and share the recipe with the adjustments I learned the hard way that I needed to make!
Everything went great right up until the end. After some panicked searching, I managed to find frozen rhubarb at Sprout’s, and it tasted just as good as the fresh stuff Grandma grows in her backyard in the summer. Her instructions were pretty vague, but I cooked it over the stove as directed, and the rhubarb broke down after a while, leaving a pink, pulpy goop. When I added the raspberry Jell-O powder, I groaned out loud, the combined smell was so nostalgic! I also had my parents’ homegrown lemon juice to use, which took the flavors up to eleven.
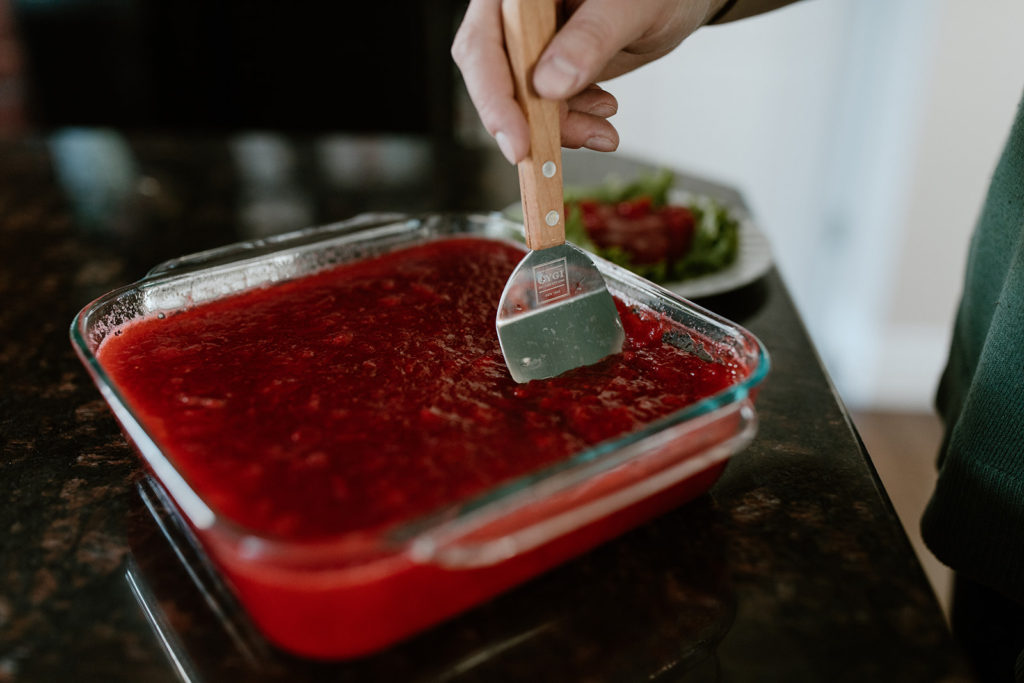
When it came time to pour the Jell-O mixture into the pan I’d brought, I learned that the 9×9 on my grandma’s recipe wasn’t a typo–my 8×8 dish was filled almost to the brim! I definitely need to use a deeper dish or a 9×9 next time.
But anyway, the Jell-O looked and smelled exactly the same as when Grandma makes it, so I put it in the fridge to let it chill for “several hours,” as the recipe said. I made the Jell-O at 11:00, and dinner was at 4:00 (we eat dinner early on Fast Sundays). I thought 5 hours would be plenty of time, but nope! As you can probably tell in the pictures, the Jell-O was a semi-solid mess when we tried to scoop it. So we put it back in the fridge while we finished dinner, cleared the dishes, played some games, and talked for a while. At 7:00, we tried again, and it STILL wasn’t set all the way! It was better, but not there.
I had to get home shortly after that, so this recipe wasn’t really a success for me. I didn’t mess it up, I just didn’t have the time to let it set properly. Now I know for next time that “several hours” means AT LEAST 8, preferably overnight. It looks like I’ll need to revisit this recipe sometime. I know all the steps, and I’m dying to replicate the beautiful slices that Grandma gives us, served on a lettuce leaf and garnished with sliced almonds. Someday, Grandma! Someday I’ll get it!
In any case, I’m glad that I finally learned how to make it on my own–it will forever remind me of Grandma, and I hope to pass it on to future generations, even if Jell-O is generally becoming an uncommon food in our family.
CONCLUSION
This meal was hearty, comforting, and truly representative of what I’ve eaten living in Utah for most of my life. I’m really happy to have learned how to make these Utah staples on my own, and I’ll definitely be making them again! I hope if you’re reading this and want a taste of what Utah food is like, you’ll try out some of these recipes too!
So how’d I do? Let me know in the comments if you have any suggestions for improvement, and be sure to tune in next time for my take on a meal inspired by Idaho! If that’s where you’re from, what do you think I should make to represent your state? Bonus points if you have reliable recipes or pro tips before I make the attempt! Thank you for reading!
4 thoughts on “Inspired by Utah”